Although there are many different types of guitars (acoustic,
electric, classical, electric-acoustic, etc.), they all have many things in
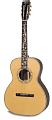
common. The diagram on the illustration page shows the various parts of a
guitar. At the top of the guitar in the illustration is the "head stock", a
general term which describes the part of the guitar attached to the slimmer neck
of the instrument. On the head stock are "tuners", which you will use to adjust
the pitch of each of the strings on the guitar. At the point in which the
head stock meets the neck of the guitar, you'll find the "nut". A nut is simply a
small piece of material (plastic, bone, etc.), in which small grooves are carved
out to guide the strings up to the tuners.
The neck of the guitar is the area of the instrument you'll
concentrate a great deal on: you'll put your fingers on various places on the
neck, in order to create different notes.
The neck of the guitar adjoins the "body" of the instrument. The
body of the guitar will vary greatly from guitar to guitar. Most acoustic and
classical guitars have a hollowed out body, and a "sound hole", designed to
project the sound of the guitar. Most electric guitars have a solid body, and
thus will not have a sound hole. Electric guitars will instead have "pick-ups"
where the sound hole is located. These "pick-ups" are essentially small
microphones, which allow the capture the sound of the ringing strings, allowing
them to be amplified. The strings of the guitar run from the tuning pegs, over
the nut, down the neck, over the body, over the sound hole (or pick-ups), and
are anchored at a piece of hardware attached to the body of the guitar, called a
"bridge".
The neck: A closer look
Examine the neck of your guitar. You'll notice there are metal
strips running across it's entire surface. These pieces of metal are referred to
as "frets" on a guitar. Now, here's what you'll need to keep in mind: the word
"fret" has two different meanings when used by guitarists. It can be used to
describe:
The piece of metal itself. The space on the neck between one piece
of metal and the next
To further explain, the area of the neck between the nut and the
first strip of metal is referred to as the "first fret". The area on the neck
between the first and second strip of metal is referred to as the "second fret".
And so on...
Now, that we know about the basic parts of a guitar, it's time to
get our hands dirty, and start learning to play it. Get yourself an armless
chair, and take a seat. You should be sitting comfortably, with your back
against the back of the chair. Slouching significantly is a no-no; you'll not
only end up with a sore back, you'll develop bad habits on the guitar.
Now, pick up your guitar, and hold it so the back of the body of
the instrument comes in contact with your stomach/chest, and the bottom of the
neck runs parallel to the floor. The thickest string on the guitar should be the
closest to your face, while the thinnest should be closest to the floor. If this
isn't the case, turn the guitar the in other direction. Typically, a
right-handed person will hold the guitar so the head stock points to the left,
whereas a left-handed person will hold the guitar so the head stock points to the
right. (NOTE: to play the guitar as a lefty would, you will need a left-handed
guitar.)
When playing the guitar sitting down, the body of the guitar will
rest on one of your legs. In most styles of guitar playing, the guitar will rest
on the leg farthest away from the head stock. This means, a person playing the
guitar in a right-handed fashion will typically rest the guitar on his/her right
leg, while someone playing the guitar in a lefty manner will rest it on their
left leg. (NOTE: proper classical guitarist technique dictates the exact
OPPOSITE of the above, but for this lesson, let's stick to our initial
explanation)
Next, concentrate on your "fretting hand" (the hand closest to the
neck of the guitar, when sitting in proper position). The thumb of your fretting
hand should rest behind the neck of the guitar, with your fingers in a slightly
curled position, poised above the strings. It is extremely important to keep
these fingers curled at the knuckles, except when specifically instructed not to
do so.
Hopefully, you've found, bought or borrowed a guitar pick. If not,
you'll need to buy yourself some. Don't be stingy, go and pick up at least 10 of
them - guitar picks are easy to lose (they often don't cost more than 30 or 40
cents each). You can experiment with different shapes and brands, but I highly
recommend medium gauge picks to start; ones that aren't too flimsy, or too
hard.
The following explains how to hold, and use a pick. When reading,
keep in mind that your "picking hand" is the hand which is nearest to the bridge
of the guitar, when sitting in the correct position.
Open your picking hand, and turn the palm to face you.
Close your hand to make a very loose fist. Your thumb should
remain beside your index finger. Rotate your hand until you are looking at it's
profile, with your thumb's knuckle facing you. With your other hand, slide your
guitar pick between your thumb and index finger. The pick should be
approximately located behind the knuckle of the thumb.
Be sure the pointed end of the pick is pointing directly away from
your fist, and is protruding by about a half an inch. Hold the pick firmly.
Position your picking hand over the sound hole of your acoustic
guitar, or over the body of your electric guitar. Your picking hand, with thumb
knuckle still facing you, should hover over the strings. Do not rest your
picking hand on the strings or body of the guitar.
Using your wrist for motion (rather than your entire arm), strike
the sixth (lowest) string of your guitar in a downward motion. If the string
rattles excessively, try striking the string a bit softer, or with less of the
pick surface. Now, pick the sixth string in an upwards motion. Repeat the
process several times. Try and minimize motion in your picking hand: one short
picking stroke downwards, then one short picking stroke upwards. This process is
referred to as "alternate picking"
Try the same exercise on the fifth, fourth, third, second, and
first strings.
Tips:
Holding the pick in this manner will invariably feel awkward at
first. You will initially have to pay special attention to your picking hand
whenever you play guitar.
Try and create fluidity in your alternate picking. Your down
strokes should sound virtually identical to your upstrokes.